Stargaze
  • Welcome
    • Coming from Ethereum?
    • Coming from Solana?
    • Coming from Coinbase or other exchange?
    • Coming from MANTRA?
  • Introduction
    • What is Stargaze?
    • Meet the Team
  • Core Apps
    • Launchpad
      • Minters
      • Whitelists
      • Minter and Whitelist Fees
    • Marketplace
      • Governance Parameters
    • Names
    • Live Auctions
    • Infinity Swap
      • How it works
      • Price Mechanics
      • Swap
      • Why use Infinity Swap
      • Infinity Swap Fees
      • Examples
    • DAO DAO
    • StarDEX
      • Navigating StarDEX
      • Swapping Tokens
      • Providing Liquidity
      • Pool Analytics & Metrics
      • Managing and Removing Liquidity
  • Creators
    • Launching a Collection on Stargaze
    • Collection Guidelines
    • Content Guidelines
    • Featured Projects
  • Creator Tools
    • Stargaze Studio
      • Create an NFT Collection
        • Upload Assets and Metadata
        • Configure Collection and Minting Details
        • Creating a Standard Collection
          • Upload Assets and Metadata
          • Configure Collection and Minting Details: Standard Collection
          • Whitelist and Royalty Options
        • Creating an Open/Limited Edition Collection
          • Upload Assets and Metadata
          • Configure Collection and Minting Details: OE/LE
          • Whitelist and Royalty Options
        • Creating a 1/1 Collection
          • Upload Assets and Metadata
          • Configure Collection Details: 1/1 Collection
          • Whitelist and Royalty Options
          • Adding Additional Tokens to a 1/1 Collection
        • Creating a Burn to Mint Collection
          • Upload Assets and Metadata
          • Configure Collection and Minting Details: Standard Collection
          • Whitelist and Royalty Options
      • Interact with a Collection
        • Execute Messages
        • Query Data
    • Launching an NFT project via CLI
      • 1. Setup a basic project
        • 1a. Need help?
      • 2. Configure your project
      • 3. Add assets and metadata
        • Pinata Upload
      • 4. Instantiate minter contract on testnet
      • 5. Whitelist
      • 6. Mint from your contract
      • 7. Query contract
      • 8. Testing your contract on testnet
      • 9. Launching on mainnet
        • 9a. Launching on mainnet with Keplr (optional)
    • Create a Multisig Wallet
      • Create a Multisig using Keplr
      • Create a Multisig using DAO DAO
      • Create a Multisig using CLI
    • Stargaze Studio Fees
  • Developers
    • CosmWasm Contracts
      • Contract Code IDs
      • Deploy to Testnet
      • Deploy to Mainnet
    • Stargaze API
    • Indexers
      • Constellations
      • SubQuery
    • Token Factory
    • Minting and Trading Denoms
  • Tokenomics
    • STARS Token
    • Fair Burn
    • Real Yield
    • Governance
  • Nodes & Validators
    • Getting Setup
    • Running a Full Node
    • Setting up Cosmovisor
    • Running a Validator
    • Configuring StateSync
    • Running a Relayer
    • Foundation Delegation Program
  • Extras
    • FAQ
    • Stargaze Assets
    • Ranking and Algorithms
Powered by GitBook
On this page
  1. Creator Tools
  2. Stargaze Studio
  3. Create an NFT Collection
  4. Creating a 1/1 Collection

Configure Collection Details: 1/1 Collection

PreviousUpload Assets and MetadataNextWhitelist and Royalty Options

Last updated 7 months ago

Collection Details

Minting Details

There is no minting phase for 1/1 collections.

Tokens will be minted directly into the creator's wallet to be transferred, auctioned, or sold directly on the secondary market.

Collection Details

Now that the assets and metadata are ready, you need to decide on the collection details. These are the essential information related to your collection, we suggest you double-check them as some of them are not changeable after the collection is published.

The following information is needed:

Collection Details

  • Name: The title of your collection

  • Description: The detailed explanation of your collection

  • Symbol: A symbol for your collection.

  • Cover Image: The cover image that will be shown on the collection page. GIFs are supported.

  • External Link (optional): A link you can provide on your collection page such as a webpage.

After completing collection details, the page should look something like this:

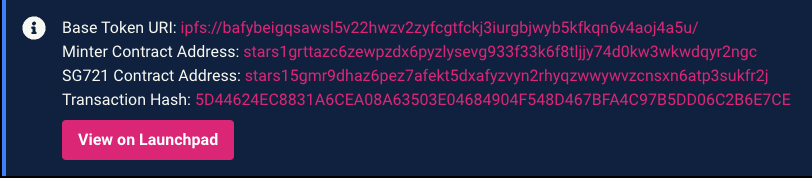
If you don't want to set any whitelist or royalty, press the Create Collection button and sign the pop-up transaction. An info box will appear at the top of the page when the transaction is confirmed.

It is important to save all the printed information as you'll need the addresses to interact with the collection. Visit the Interact with a Collection page to learn about the interactions you can have with the collection after the launch.

Congrats! You have successfully learned how to create and publish an NFT collection.

It may take a little time until your collection appears on Stargaze.

Now that the essential details are filled, the collection is ready to be published. However, if you want to set a royalty percentage, proceed to the .

Whitelist and Royalty Options
All addresses related to your collection